def draw_n(
n:int, # Number of cards to draw
replace:bool=True # Draw with replacement?
)->list: # List of cards
"Draw `n` cards."Notebook Best Practices
How to write great nbdev notebooks
The flexibility offered by notebooks can be overwhelming. While there are industry standards for writing Python packages—like numpy and sphinx docstrings, and pytest and unittest testing frameworks—they weren’t designed for notebooks.
This article walks you through the practices we’ve learned to leverage the full power of notebooks with nbdev1. Our approach weaves code, tests, and docs into a single interactive context that invites experimentation. If you prefer to learn by example, you might want to start with the annotated example and branch out from there.
Know which form of notebook you’re writing
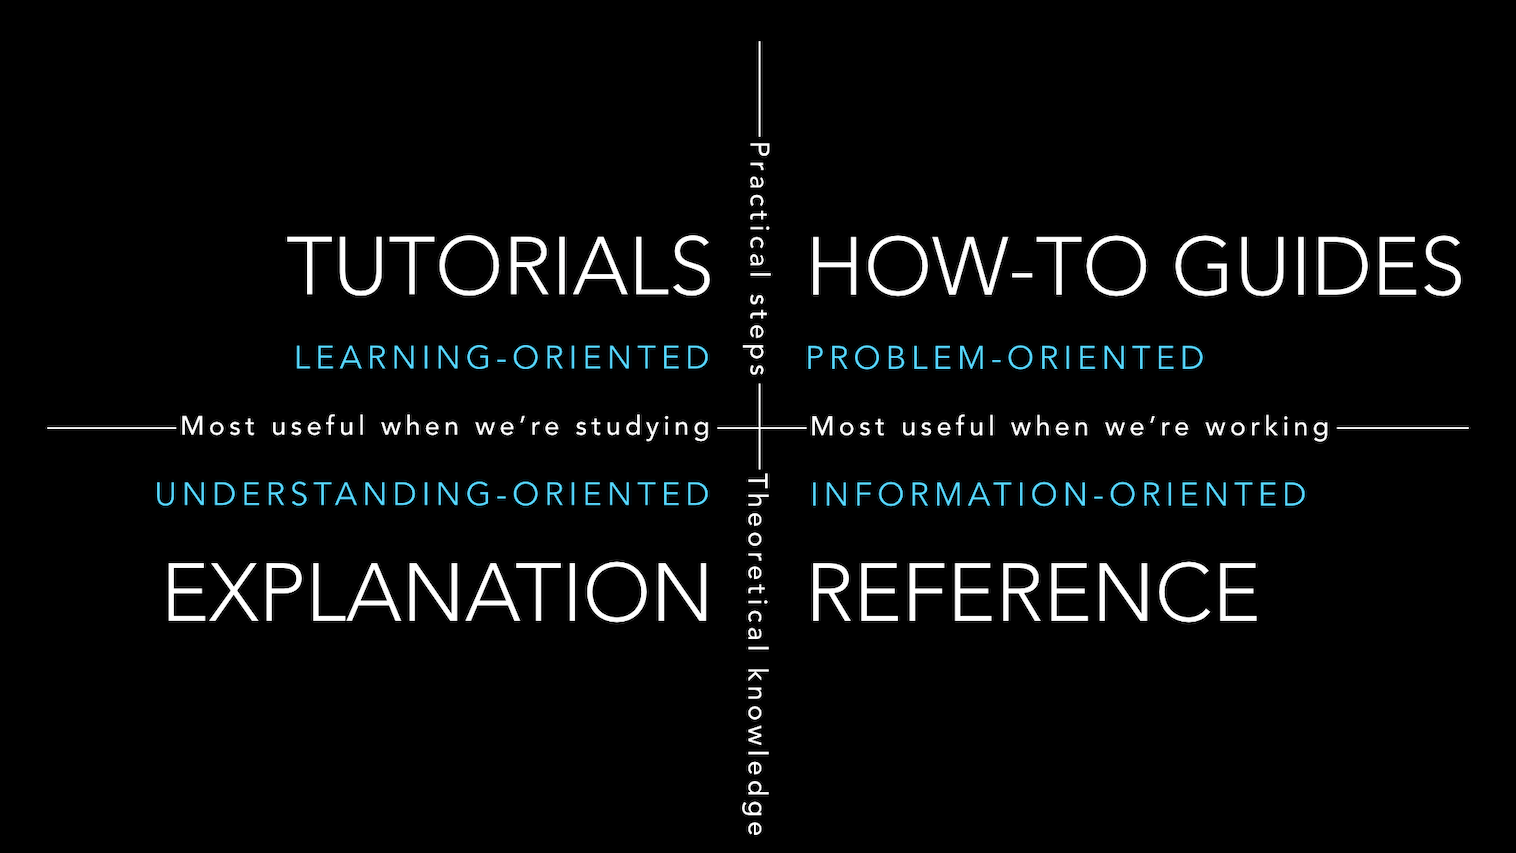
First of all, decide which form of notebook you’re writing. We’re fans of the Diátaxis system which classifies documentation into four forms: tutorials, how-to guides, explanations, and references. They’ve laid this out beautifully in the following diagram:
Start with a great title and subtitle
Start with a markdown cell at the top of your notebook with its title in an H1 header, and subtitle in a blockquote. For example:
# Great title

> And an even better subtitle
The title will also be used to reference your page in the sidebar. You can also optionally add frontmatter to this cell to customize nbdev and Quarto.
Introduce your notebook
Introduce your notebook with markdown cells below the title. We recommend a slightly different approach depending on the form of documentation:
- Reference: Start with a brief description of the technical component, and an overview that links to the main symbols in the page (you might want to use doclinks)
- Tutorials and how-to guides: Describe what the reader will learn and how. Keep it short and get to the subject matter quickly
- Explanations: Since these are typically very focused, a short description of the topic is often sufficient.
Note that Markdown lists such as the one above require a blank line above them to be rendered as lists in the documentation, even though the notebook viewer will render lists that are not preceded by a blank line.
Use lots of code examples, pictures, plots, and videos
Take advantage of the richness of notebooks by including code examples, pictures, plots, and videos.
Here are a few examples to get you started:
- fastai’s documentation makes extensive use of code examples, plots, images, and tables, for example, the computer vision intro
nbdev.releaseopens with a terminal screencast demo in SVG format created with asciinema and svg-term-cli- The documentation explanation describes a complex data pipeline using a Mermaid diagram
- The directives explanation showcases all of nbdev’s directives with executable examples in call-out cards (and makes great use of emojis too!)
- RDKit renders beautiful molecule diagrams
Keep docstrings short; elaborate in separate cells
While nbdev renders docstrings as markdown, they aren’t rendered correctly when using symbol? or help(symbol) and they can’t include executed code. By splitting longer docstrings across separate code and markdown cells you can use code examples, pictures, plots, and videos.
We find a single-line summary sufficient for most docstrings.
Document parameters with docments
fastcore.docments is a concise way to document parameters that is beautifully rendered by nbdev. For example, this function:
…would include the following table as part of its documentation:
| Type | Default | Details | |
|---|---|---|---|
| n | int | Number of cards to draw | |
| replace | bool | True | Draw with replacement? |
| Returns | list | List of cards |
nbdev also supports some numpy docstring sections. For example, this code snippet would produce the same table (there’s no need to include types like in the docstring if you already have annotations):
def draw_n(n:int, replace:bool=True) -> Cards:
    """
    Draw `n` cards.

    Parameters
    ----------
    n
        Number of cards to draw
    replace
        Draw with replacement?

    Returns
    -------
    cards
        List of cards
    """
You can render a symbol’s parameters table directly with DocmentTbl. In fact, that’s how we rendered the table above.
Make code cells short, and demonstrate them immediately
In notebooks, do not create long functions and classes with comments interspersed throughout them. Instead, split your code up into small separate cells with explanations and working examples after each. This lets the user understand how each part works and experiment with them straight away. It also helps you during development because you can explore the behavior of every part of your code interactively.
In non-notebook coding, the documentation, tests, code, and examples are all separate. This is not the case with nbdev. Take advantage of this by keeping all of these things as close together as possible. This is helpful both for exploration and for documentation.
For example, consider the section of the Claudette source notebook for implementing image support. The section immediately imports an image and displays it, showing how to work with a file format. It then creates a number of helper functions, describes and demonstrates them, and finally puts it all together to show how to use the complete feature in practice with real inputs and outputs running directly in the notebook.
In order to avoid long class definitions caused by many methods, consider using fastcore’s patch decorator to implement each method separately, and immediately document, demonstrate, and test it.
Consider turning code examples into tests by adding assertions
nbdev blurs the lines between code, docs, and tests. Every code cell is run as a test (unless it’s explicitly marked otherwise), and any error in the cell fails the test.
Consider turning your code examples into tests by adding assertions – if they would make valuable tests and if it doesn’t hurt readability. fastcore.test provides a set of light wrappers around assert for better notebook tests (for example, they print both objects on error if they differ).
Here’s an example using fastcore.test.test_eq:
def inc(x): return x + 1
test_eq(inc(3), 4)
Document error-cases as tests
Docstring-driven approaches typically document the errors raised by an object using plaintext descriptions, for example, in a “raises” section.
In nbdev, we recommend documenting errors with actual failing code using the fastcore.test.expect_fail context manager. For example:
def divide(x, y): return x / y
with expect_fail(contains="division by zero"): divide(1, 0)
The body only “passes” by raising: expect_fail catches the exception and fails the cell if none is raised. You can also pass an exception type to require, e.g. expect_fail(ZeroDivisionError).
Add rich representations to your classes
This is another way to take advantage of the rich display feature of notebooks. You can provide rich representations to your object by defining a _repr_markdown_ method that returns markdown text (which may also include HTML/CSS).
Here’s a simple example to get you started:
class Color:
    def __init__(self, color): self.color = color
    def _repr_markdown_(self):
        style = f'background-color: {self.color}; width: 50px; height: 50px; margin: 10px'
return f'<div style="{style}"></div>'Color('green')Color('blue')Also see the earlier list of example projects that make use of beautiful visual representations.
Document class methods with show_doc or fastcore.basics.patch
nbdev automatically documents exported function and class definitions with show_doc. However, it’s up to you to document class methods. There are two ways to do that: calling show_doc on the method, or defining the method with the fastcore.basics.patch decorator.
If your class is defined in a single cell, use show_doc. Here’s what your notebook might look like:
#| export
class Number:
    "A number."
    def __init__(self, num): self.num = num
    def __add__(self, other):
        "Sum of this and `other`."
        return Number(self.num + other.num)
    def __repr__(self): return f'Number({self.num})'
For example, here is the number 5:
Number(5)show_doc(Number.__add__)For example:
Number(3) + Number(4)If you split your class definition across cells with fastcore.basics.patch, here’s what your notebook might look like:
#| export
class Number:
    "A number."
    def __init__(self, num): self.num = num
    def __repr__(self): return f'Number({self.num})'
For example, here is the number 5:
Number(5)#| export
@patch
def __add__(self:Number, other):
"Sum of this and `other`."
return Number(self.num + other.num)For example:
Number(3) + Number(4)In either case, this is how the documentation would be rendered:
Number
Number (num)
A number.
For example, here is the number 5:
Number(5)Number(5)Number.__add__
Number.__add__ (other)
Sum of this and other.
For example:
Number(3) + Number(4)Number(7)Group symbols with H2 sections
As your notebooks grow, consider grouping related symbols using markdown cells with level 2 headers. Since nbdev displays documented symbols as level 3 headers, this would group all symbols below your level 2 header.
Here is the markdown syntax:
## Section titleSplit long explanations with H4 sections
Similar to the previous section, as a symbol’s explanation grows, consider grouping its cells using level 4 headers. This is the recommended way to structure your reference docs, for example, to achieve numpy-style structures with sections like notes, examples, methods, and so on.
Here’s the markdown syntax:
#### Section titlePutting it all together: an annotated example
In this section, we’ll guide you through a full example of writing a documented and tested function in a notebook using all of the principles described above. We’ll use the numpy.all function since it follows the widely-known numpy-docstring standard for .py files.
Below is the definition of the numpy.all function. Take note of how all of the information is included in the docstring. While this works well for .py files, it doesn’t let us weave executable code with rich markdown as we can in notebooks:
def all(a, axis=None, out=None, keepdims=np._NoValue, *, where=np._NoValue):
    """
    Test whether all array elements along a given axis evaluate to True.
    Parameters
    ----------
    a : array_like
        Input array or object that can be converted to an array.
    axis : None or int or tuple of ints, optional
        Axis or axes along which a logical AND reduction is performed.
        The default (``axis=None``) is to perform a logical AND over all
        the dimensions of the input array. `axis` may be negative, in
        which case it counts from the last to the first axis.
        .. versionadded:: 1.7.0
        If this is a tuple of ints, a reduction is performed on multiple
        axes, instead of a single axis or all the axes as before.
    out : ndarray, optional
        Alternate output array in which to place the result.
        It must have the same shape as the expected output and its
        type is preserved (e.g., if ``dtype(out)`` is float, the result
        will consist of 0.0's and 1.0's). See :ref:`ufuncs-output-type` for more
        details.
    keepdims : bool, optional
        If this is set to True, the axes which are reduced are left
        in the result as dimensions with size one. With this option,
        the result will broadcast correctly against the input array.
        If the default value is passed, then `keepdims` will not be
        passed through to the `all` method of sub-classes of
        `ndarray`, however any non-default value will be.  If the
        sub-class' method does not implement `keepdims` any
        exceptions will be raised.
    where : array_like of bool, optional
        Elements to include in checking for all `True` values.
        See `~numpy.ufunc.reduce` for details.
        .. versionadded:: 1.20.0
    Returns
    -------
    all : ndarray, bool
        A new boolean or array is returned unless `out` is specified,
        in which case a reference to `out` is returned.
    See Also
    --------
    ndarray.all : equivalent method
    any : Test whether any element along a given axis evaluates to True.
    Notes
    -----
    Not a Number (NaN), positive infinity and negative infinity
    evaluate to `True` because these are not equal to zero.
    Examples
    --------
    >>> np.all([[True,False],[True,True]])
    False
    >>> np.all([[True,False],[True,True]], axis=0)
    array([ True, False])
    >>> np.all([-1, 4, 5])
    True
    >>> np.all([1.0, np.nan])
    True
    >>> np.all([[True, True], [False, True]], where=[[True], [False]])
    True
    >>> o=np.array(False)
    >>> z=np.all([-1, 4, 5], out=o)
    >>> id(z), id(o), z
    (28293632, 28293632, array(True)) # may vary
    """
    ...
Alternatively, Here is how we’d write numpy.all in a notebook using nbdev. The first step is to define the function:
#| export
def all(
    a, # Input array or object that can be converted to an array.
    axis:int|tuple|None=None, # Axis or axes along which a logical AND reduction is performed (default: all).
    out:np.ndarray|None=None, # Alternate output array in which to place the result.
    keepdims:bool=np._NoValue, # Leave reduced one-dimensional axes in the result?
    where=np._NoValue, # Elements to include in reduction. See `numpy.ufunc.reduce` for details. New in version 1.20.0.
) -> np.ndarray|bool: # A new boolean or array, or a reference to `out` if its specified.
    "Test whether all array elements along a given axis evaluate to `True`."
    ...
We can observe the following differences between this code and numpy-docstrings:
- The definition uses simple type annotations, which will be rendered in the function’s parameters table below
- Parameters are described with a short comment, called docments – a concise alternative to numpy and sphinx docstring formats (although nbdev does support numpy docstrings see this example)
- The docstring and parameter descriptions are all short, single-line summaries. We prefer to keep docstrings short and instead elaborate in separate cells, where we can use markdown and real code examples.
Note: the use of | syntax for unions e.g. int|tuple|None (equivalent to Union[int, tuple, None]) requires using Python 3.10 or by treating all annotations as strings using from __future__ import annotations which is available from Python 3.7.
Our function definition is automatically rendered in the docs like this. Note that parameter names, types, defaults, and details are all parsed from the definition which means you don’t have to repeat yourself.
all
 all (a, axis:Union[int,tuple,NoneType]=None,
      out:Optional[numpy.ndarray]=None, keepdims:bool=<no value>,
      where=<no value>)
Test whether all array elements along a given axis evaluate to True.
| Type | Default | Details | |
|---|---|---|---|
| a | Input array or object that can be converted to an array. | ||
| axis | int | tuple | None | None | Axis or axes along which a logical AND reduction is performed (default: all). |
| out | np.ndarray | None | None | Alternate output array in which to place the result. |
| keepdims | bool | Leave reduced one-dimensional axes in the result? | |
| where | _NoValueType | Elements to include in reduction. See numpy.ufunc.reduce for details. New in version 1.20.0. |
|
| Returns | np.ndarray | bool | A new boolean or array, or a reference to out if its specified. |
Next, describe how to use your function using markdown cells and lots of code examples. This is the biggest benefit to developing in notebooks: instead of copying and pasting code examples into plaintext, you can include real executeable code examples.
We start with basic usage first:
For example:
x = [[True,False],[True,True]]
test_eq(np.all(x), False)
Our code examples use assertion functions from fastcore.test, so that they serve as both docs and tests. nbdev-test runs every code cell as a test (unless it’s explicitly marked otherwise), and any error in the cell fails the test.
Having described basic usage, we now elaborate on more advanced functionality for each parameter. This differs from numpy’s approach which includes all parameter docs in the table and where not all parameters have code examples.
With axis:
test_eq(np.all(x, axis=0), [True,False])axis may be negative, in which case it counts from the last to the first axis:
test_eq(np.all(x, axis=-1), [False,True])If axis is a tuple of ints, a reduction is performed on multiple axes, instead of a single axis or all the axes as before.
test_eq(np.all(x, axis=(0,1)), False)Integers, floats, not a number (nan), and infinity all evaluate to True because they’re not equal to zero:
test_eq(np.all([-1, 1, -1.0, 1.0, np.nan, np.inf, -np.inf]), True)You can use where to test specific elements. For example, this tests only the second column:
test_eq(np.all(x, where=[[False],[True]]), True)The output can be stored in an optional out array. If provided, a reference to out will be returned:
o = np.array(False)
z = np.all([-1, 4, 5], out=o)
test_is(z, o)
test_eq(z, True)
out must have the same shape as the expected output and its type is preserved (e.g., if dtype(out) is float, the result will consist of 0.0’s and 1.0’s). See Output type determination for more details.
With keepdims, the result will broadcast correctly against the input array.
test_eq(np.all(x, axis=0, keepdims=True), [[True, False]]) # Note the nested listIf the default value is passed, then keepdims will not be passed through to the all method of sub-classes of ndarray, however any non-default value will be. If the sub-class’ method does not implement keepdims any exceptions will be raised.
class MyArray(np.ndarray):
    def all(self, axis=None, out=None): ...

y = MyArray((2,2))
y[:] = x
np.all(y) # No TypeError since `keepdims` isn't passed
with expect_fail(contains="all() got an unexpected keyword argument 'keepdims'"): np.all(y, keepdims=True)
Since we prefer to document via code examples, we also document error-cases with assertions using the fastcore.test.expect_fail context manager. This differs from docstring-based approaches which usually document error-cases in prose, usually in a “raises” section of the docstring.
Finally, we link to related symbols with doclinks (symbols surrounded in backticks are automatically linked) and describe their relation using code examples.
The numpy.ndarray.all method is equivalent to calling numpy.all with the array:
test_eq(np.array(x).all(), np.all(x))In contrast, numpy.any tests whether any element evaluates to True (rather than all elements):
test_eq(np.any(x), True)Recap
In summary, here is how the nbdev version of numpy.all differs from the numpy docstring. nbdev uses:
- Type annotations and docments instead of the numpy docstring format (although nbdev supports numpy docstrings too)
- Short parameter descriptions, with details in separate cells with markdown and code example
- Doclinks to related symbols instead of a “See also” section
- Lots of code examples (which are also tests) mixed with prose to describe how to use the function
- Code examples with assertions to document error-cases instead of a “Raises” section.